 white studio
Furniture Photography Lighting Guide: A Practical Reference for E-Commerce
By Vee S. · Founder, White Studio
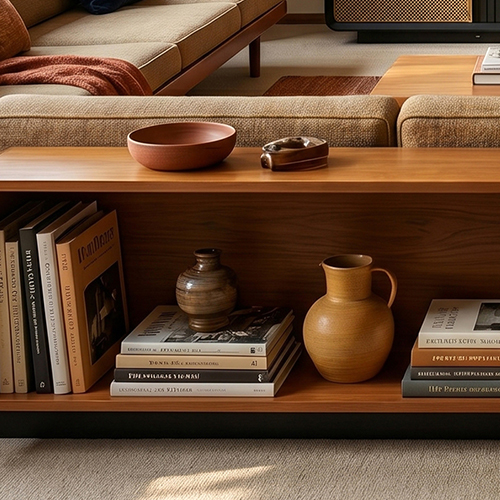
Lighting is the single most influential variable in furniture photography. A well-designed chair photographed under flat warehouse fluorescents will look uninspiring. The same chair, lit with intention, can communicate craftsmanship, scale, and material quality before a customer reads a single word of copy. For furniture brands selling online, lighting is not an aesthetic preference — it is a conversion tool.
This guide walks through the principles of furniture photography lighting in a practical, rational way. Whether you shoot in a dedicated studio, a showroom corner, or a factory floor, the same fundamentals apply. And if you ultimately plan to use a service like White Studio to transform your source photos into a full commercial image set, strong lighting at capture time still matters — even though AI can reconstruct and normalize light to a significant degree.
Why Lighting Matters More for Furniture Than for Smaller Products
Furniture occupies physical space. It has volume, depth, and surface area that smaller products simply do not. A pendant lamp might be photographed with a single softbox. A sectional sofa requires a lighting strategy that reveals its full silhouette, its cushion depth, its leg structure, and the texture of its upholstery — all at once.
Poor lighting creates problems that are expensive to fix in post-production:
- Lost texture detail. Fabric weaves, wood grain, and leather patina disappear under flat or harsh light.
- Misleading color. Warm tungsten bulbs shift wood tones toward orange; cool fluorescents make gray upholstery look blue.
- Unnatural shadows. Deep, undefined shadows under a dining table suggest poor build quality or make the piece appear to float unnaturally.
- Blown highlights. Glossy lacquer finishes and polished metal hardware reflect light sources directly, creating distracting hot spots.
For e-commerce furniture photography, the goal is not dramatic editorial lighting. The goal is clarity, accuracy, and consistency across your entire catalog. Customers need to trust what they see.
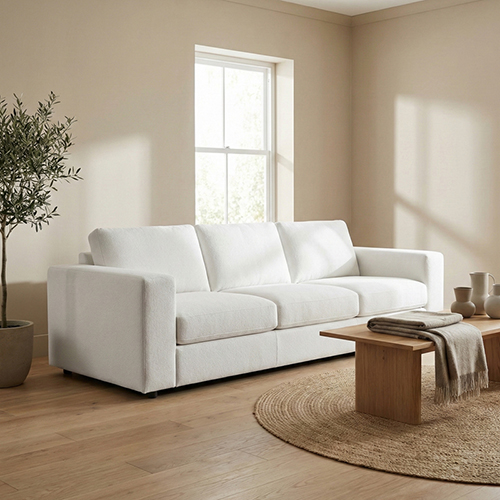
A delivered still: soft, directional daylight keeps white upholstery from blowing out.
Natural Light: The Most Accessible Starting Point
If you do not have a studio, natural daylight is your best ally. Window light, when used correctly, produces soft, directional illumination that reveals form without harsh contrast.
Positioning Relative to the Window
Place the furniture so that light falls across it at roughly a 45-degree angle. This creates gentle modeling — light on one side, subtle shadow on the other — which helps viewers perceive depth. Avoid placing the product directly facing the window, which produces flat, front-lit results with little dimension. Also avoid placing the product with the window directly behind it, unless you are deliberately creating a silhouette (which is rarely useful for product pages).
A large north-facing window (in the Northern Hemisphere) provides the most consistent daylight throughout the day. South-facing windows produce stronger, more variable light that changes noticeably hour to hour.
Diffusing Direct Sunlight
Direct sun through a window creates hard shadows and high contrast. Hang a white diffusion panel or even a sheer curtain between the window and the product. The light becomes softer, shadows become more gradual, and material textures become easier to read.
If you are photographing outdoors — for example, on a showroom patio — choose open shade rather than direct sunlight. The underside of a white canopy or the shadow side of a building works well. Direct midday sun is almost always too harsh for furniture product images.
Time of Day
Early morning and late afternoon produce warmer, softer light. Midday light, even diffused, tends to be cooler and more neutral. For catalog consistency, pick a time of day and stick with it across your shoot. Mixing morning-warm and afternoon-cool images in the same product line creates a subtly incoherent storefront.
Artificial Lighting: Studio Setups for Furniture
When natural light is unavailable or inconsistent — common in warehouses and large showrooms — artificial lighting gives you control. The standard approach for furniture photography lighting uses large, soft light sources to mimic window light at scale.
Key Light
The key light is your primary light source. For furniture, use a large softbox or a diffused strobe positioned at roughly 45 degrees to the camera and 45 degrees above the product. The size of the modifier matters: the larger the light source relative to the subject, the softer the shadows. A 4-foot softbox at six feet from a dining chair produces beautiful, wraparound light. That same softbox at six feet from a king-size bed may not be large enough — you may need multiple sources or a bigger modifier.
Fill Light
Fill light reduces the contrast between the lit side and the shadow side of the product. A second softbox on the opposite side, set to roughly half the power of the key light, is a standard approach. Alternatively, a white foam core board (reflector) placed on the shadow side bounces key light back onto the product without adding a second light source.
The ratio between key and fill determines the mood. A 2:1 ratio (one stop difference) produces gentle, commercial-friendly results. A 4:1 ratio or higher creates more dramatic shadows — better for editorial work, less ideal for standard e-commerce furniture photography.
Background Light
When shooting on a white or gray seamless backdrop, illuminate the background separately from the product. This prevents the product from casting a dark shadow on the backdrop and helps achieve the clean, pure white backgrounds required by Amazon and many Shopify themes. A pair of lights aimed at the backdrop from behind the product, feathered to avoid spill onto the subject, is the standard technique.
Overhead and Accent Considerations
Overhead fluorescent tubes — common in warehouses — are generally unsuitable as primary lighting for product photography. They produce uneven, green-tinted light and create shadows directly beneath the product that are difficult to control. If you must shoot under overheads, turn them off and rely on your own lighting setup instead.
Accent lights can highlight specific details — the brass hardware on a cabinet, the tufting on a headboard — but use them sparingly. Over-lit detail shots that do not match the lighting of your hero images create catalog inconsistency.
Lighting by Material Type
Different furniture materials respond to light differently. Adjusting your approach by material type improves results significantly.
Fabric and Upholstery
Soft, diffused light is essential for fabric. Hard light creates specular highlights on synthetic fibers and can make velvet look flat rather than rich. Side lighting at a moderate angle reveals weave texture without blowing out light-colored fabrics. For dark upholstery — charcoal performance fabric, navy boucle — increase fill light slightly to open up shadow detail.
Wood
Wood benefits from directional light that emphasizes grain. A raking light (light positioned at a low angle relative to the surface) can make oak grain pop beautifully. Be careful with glossy finishes: a raking angle on a high-gloss dining table produces long, bright reflections that may need flagging (blocking with a black panel) to control.
Metal and Glass
Metal reflects its environment. Control what the metal sees: surround glossy legs or frames with black flags to prevent the light source from appearing as a distracting white rectangle in the reflection. Glass and mirrored surfaces are among the most challenging subjects in furniture photography lighting. Minimize visible light sources in reflections, and consider shooting at an angle that avoids direct reflection of the camera.
Leather
Leather has a subtle sheen that communicates quality when lit well. Soft, slightly directional light at a 30-to-45-degree angle works best. Avoid flat frontal light, which makes leather look like plastic.
Color Temperature and White Balance
All light sources have a color temperature measured in Kelvin. Daylight is roughly 5500K–6500K. Tungsten bulbs are around 3200K. Fluorescent tubes vary widely but often sit around 4000K with a green cast.
For furniture product photography, aim for a consistent color temperature across your shoot. If mixing sources, gel your lights to match or shoot with all lights off except your controlled strobes.
Set your camera's white balance manually rather than relying on auto white balance, which shifts from frame to frame. A custom white balance shot using a gray card in the same light as your product ensures accurate wood tones and fabric colors. Accurate color at capture reduces correction work later — whether you retouch manually or submit images to an AI furniture photography platform.
Shadow Control for E-Commerce
Shadows serve two purposes in product photography: they define form, and they anchor the product to the ground. Both matter for e-commerce.
A product with no visible shadow appears to float, which subconsciously reduces trust. A product with a heavy, undefined shadow looks like a bad cutout. The ideal drop shadow is soft, slightly elongated, and positioned consistently across your catalog — typically falling to the rear-right or rear-left of the product depending on your key light position.
In a studio with a white floor, you can create natural shadows through lighting alone. On location, you may need to accept the existing shadow and address it in post-production or through AI processing.
When preparing photos for services like White Studio, a natural, soft shadow in your source image gives the AI useful information about the product's contact with the ground plane. Completely flat, shadowless warehouse shots are workable but give the system less spatial context.
Common Lighting Mistakes in Furniture Photography
Understanding what goes wrong helps you avoid repeating common errors:
- Shooting under mixed color temperatures. Warehouse fluorescents plus a window plus a tungsten floor lamp creates three different color casts in one image.
- Using on-camera flash. Direct flash from the camera position produces flat, unflattering light with harsh shadows behind the product.
- Underexposing dark furniture. Dark wood and charcoal fabric need slightly more exposure than your camera's meter suggests. Check your histogram and expose to preserve shadow detail.
- Overexposing light furniture. White sofas and bleached oak require careful exposure to avoid clipping highlights. Bracket if necessary.
- Ignoring the ceiling. Low warehouse ceilings bounce light unpredictably. A dark ceiling (or black cloth hung above) gives you more control.
- Inconsistent lighting across SKUs. Photographing your spring collection in March and your fall collection in September under different conditions produces a catalog that feels disjointed.
Lighting for AI-Enhanced Furniture Photography
AI furniture photography platforms — including White Studio — can reconstruct lighting, replace backgrounds, and generate lifestyle environments from a source photograph. This capability is powerful, but it is not unlimited.
The AI works best when your input photo contains:
- Accurate color information. Correct white balance at capture means the AI does not have to guess your wood stain or fabric dye.
- Visible material detail. Well-lit texture gives the AI data to enhance rather than invent.
- Clear product edges. Good lighting helps edge-detection algorithms separate the product from its background cleanly.
- Reasonable dynamic range. Avoid images where highlights are completely blown or shadows are pure black — the AI cannot recover detail that was never captured.
You do not need a professional studio to get usable results. A smartphone photo taken near a large window on an overcast day often provides sufficient lighting quality for a 16-image commercial package delivered within 24 hours. The lighting guide above helps you maximize that input quality regardless of your equipment budget.
Building a Repeatable Lighting Workflow
Consistency across dozens or hundreds of SKUs requires a workflow, not one-off improvisation. Document your setup:
- Record light positions, power settings, and modifier sizes.
- Note camera settings (aperture, shutter speed, ISO, white balance).
- Mark the product placement on the floor with tape.
- Shoot a gray card reference frame at the start of each session.
When you scale your catalog — or when you hand off source photos to an AI service — this documentation ensures every product is captured under the same conditions. Consistency builds brand trust.
For brands that lack the time or space for a full studio, the practical path is often a simplified version of this workflow: consistent window light, a fixed camera position, and three angles per product. Upload those photos to White Studio, choose your style direction, and receive a complete set of white-background, lifestyle, and detail images without renting a studio or hiring a crew.
Conclusion
Furniture photography lighting is not mysterious. It is a set of principles — soft directional light, controlled shadows, accurate color, material-aware adjustments — applied consistently across your catalog. Natural light works beautifully when managed with diffusion and timing. Studio strobes offer control when natural light is unavailable. Material type dictates small but important adjustments.
Good lighting at capture time improves every downstream step: faster retouching, better AI enhancement, higher customer trust, and lower return rates. Whether you build an in-house studio or photograph products on the factory floor with a phone, investing an hour in lighting setup pays dividends across your entire e-commerce operation.
Ready to turn well-lit source photos into a complete commercial image suite? Start your project — 16 images, delivered within 24 hours.
For a deeper overview of how White Studio transforms your photographs into studio-quality e-commerce imagery, see What is White Studio?.